"Who wants cake?"

Wednesday, 3 October 2012

Autumn Worthy Cookies

Autumn is in the air! Even here in Texas the mood outdoors is changing; leaves falling, less sunlight, crisp air, and sweater-worthy days. When I think fall, I think of apple picking with my mom, grandmother, aunt, and cousin. We used to go to this old woman's house on an apple orchard about 10 minutes away and pick a bushel which we would end up keeping in our garage over fall/winter. The best apples to me are the crunchie sweet ones like granny smith. The crunch of them is just satisfying in a way. Another fall favourite is oatmeal. Although eating oatmeal is not my favourite, I love to use it in baking. The last ingredient fall makes me think of which I'm sure you can guess; cinnamon! From cinnamon dolce lattes from Starbucks to pumpkin pie, there is a plethora of cinnamon in the fall-time. I decided to combine the three and make some delicious tasting fall worthy cookies. Here it is!

Apple Oatmeal Cinnamon Cookies

Ingredients

1/2 cup of unsalted butter
1/2 cup of sugar
1/2 cup of brown sugar
1 egg
1 cup of flour
1-1/2 cups of rolled oats
1/2 tsp of baking powder
1/2 tsp of baking soda
1/2 tsp of salt
1 tsp of cinnamon
1 large granny smith apple, chopped (leave the peel on, it give it more crunch!)

Directions
  1. Dice the apples.
  2. Cream together the sugars with the butter. Add in the egg.
  3. Combine your dry ingredients together then add to the sugar mixture and combine with a wooden spoon.
  4. Fold in the apples.
  5. Drop tablespoons onto a parchment lined cookie sheet and bake in a 350 degree oven for 12-15 minutes or until golden brown.


Monday, 24 September 2012

Cake Fundamentals


     Although the idea of making a cake may sound juvenile and simple, the world of baking and pastry has been brewing up a storm in the past couple of years. Knowing how to put together a cake is a skill that is often overlooked by most, but can evidently become a lucrative career or side-job for anyone of any age. From preparing a sponge batter, to baking, from icing a cake, and putting it all together, you’ll find all you need to know, and the tips and tricks in-between, right here.

     I believe that the most important part of cake fundamentals is what you will learn in the next few sentences. Without a proper base for your creation, which evidently is the cake, you will have not have a good foundation on which to build. In baking terms “the cake” is referred to as sponge. You want to make sure that you handle your sponge with care and treat it gingerly when making the batter. Flour and all other dry ingredients are sifted into the liquid mixture of your sponge so as to not create lumps. When adding the dry ingredients, it is important to fold them in; one of the most common mistakes people make is to feverishly mix their batter; what this does to the sponge is create a “tough crumb” texture which makes the sponge dense and less absorbent of moisture from your fillings. Preparing your pans for baking the sponge is the next step. You should thoroughly coat the inside of your pan with cooking spray or brush it with melted butter. Another important tip that will make life easier once it comes to handling the sponge after it is baked is to cut a piece of parchment paper (not wax paper) to place in the bottom of the pan. The parchment will help to release the sponge out of the pan, but will also help the sponge retain its moisture.

     Once your sponge comes out of the oven, it is important to let it stay in the pan for about 30 minutes; until the sponge is cool enough to handle. Day old sponge is easier to work with for cake assembly and will also help when cutting the sponge as it will be less crumby. You may notice at this point that your sponge has taken on a dome-like shape. At this point, the sponge must be levelled off using a long serrated knife, making sure that your sponge is on a level surface. Next, the sponge must be cut into the different layers. How many layers are dependent on your preference, but I try to cut four or fewer. The easiest way to cut even layers is to turn the cake on its side and divide the height of the cake by the amount of layers you desire. Cut into the cake just a tad where each layer will be. Setting the cake back down on a level surface, you want to place your knife into the cut you made, starting with the top layer, and cut around the cake but not quite to the middle the first time around. Continue with this until you cut the layer off.

     Now that you have your layers of sponge, it is time to put your cake together. You want to put your cake on a solid foundation. Cake boards come in many sizes and varying thicknesses. Make sure to select a size appropriate to the shape and size of the cake you are making. Having a piping bag ready, filled with buttercream, pipe a small amount onto your cake board. Place the first layer of sponge down. The next step is to soak the cake in a sugar syrup; this is a mixture of two parts sugar and one part water boiled in a saucepan until the sugar dissolves (remember to cool your sugar syrup). With a small off-set spatula, smooth a very thin layer of buttercream onto the sponge. The next step, using your piping bag, pipe a “dam” around the edge of your cake. This “dam” will help to prevent your flavoring or any toppings, such as fruit, from spewing out the sides of your cake. Add more buttercream if needed to fill in gaps that might have been created by your toppings and smooth over with your spatula making sure that this layer is level. Continue to repeat this process until all your layers are completed finishing with sugar syrup on the top layer. At this point you want to chill your cake for 20 minutes, just so that the buttercream stiffens a little, before continuing on to the crumb coat. In order to crumb coat your cake you want to make sure that you place it onto a turntable. With a large off-set spatula apply buttercream to the top of the cake making sure you smooth it out so the top layer is level. Next, work on covering the sides of the cake using the turntable to your advantage to smooth out the sides. The last part is to deal with the “shoulders” of the cake; this is where the top part of the cake meets the sides. You need to use a clean spatula and start from the side smoothing over the “shoulder” onto the top of the cake using a quick motion. Make sure to clean your spatula every time you go back to smooth the shoulder. Chill the cake again so that everything can settle.

     At this point your cake is completed, unless you choose to cover it in fondant or create tiers. If you choose to cover your cake in fondant, when you roll out the fondant use a mixture of icing sugar and cornstarch to dust your surface as to prevent sticking. When making a tiered cake you must have a support system. Wooden or hollow plastic dowels are used to support each tier. They must be cut to the height of each cake and placed into the middle of the cake. When stacking tiers you want to add a little buttercream or royal icing between the tiers to act as a sort of “glue”.

     Decorating a cake is when you bring the cake to life. Color and decorations set the mood for the cake. This is where your creativity comes into play. You can color the fondant to whatever color your heart desires. Perhaps cover the cake in gumpaste sugar flowers or handmade figurines. Airbrush a masterpiece onto each tier. Create the look of fabric on your fondant by using a quilting tool. The choice is up to you.

     The only way to master the art of cake making is to practice, practice, practice! These cake fundamentals laid out for you will create the basis to your knowledge of cake making and a foundation on which to start a new and exciting hobby.

Sunday, 16 September 2012

Cafe Quality Chocolate Cookie Base

This weekend I was in search of the best chocolate cookie base recipe that I could add my beloved reese's peanut butter chips to. Chocolate base cookies are always tricky and up until now all the cookie bases I've tried are either too crunchy, too cake-y, or just didn't taste all that great. This recipe is the perfect harmony between a chewy and crisp cookie. The edges have just enough crispness and the inside is just chewy enough that you don't get cookie crumbs all over your face when you dig in.

Chocolate Cookie Base

*Add in your favorite nuts, chocolate, or maybe even peanut chips to this base!

Ingredients

1 cup of butter, softened
1 1/2 cups of granulated sugar
2 eggs
2 cups of all-purpose flour
2/3 cup of cocoa powder
1 tsp of baking soda
1 tsp of salt

Directions

  1. Cream together the butter and the sugar. Add in the eggs on at a time.
  2. Sift together the rest of the ingredients. Stir into the butter mixture until combined.
  3. Fold in any desired add-ins.
  4. Drop by the spoonful onto a cookie sheet and bake at 350 degrees for 12 minutes.

* It is very important to leave these cookies to cool on the cookie tray after you take them out for about ten minutes! Do not touch them, they will break if you do not let them rest*


A chocolate-y evening yum! :D

Thursday, 9 August 2012

Zebra Purse

Something new that I haven't ever made before; a gumpaste purse. The purse was not as hard as I thought it would be to make, although I did have to make a wooden internal structure so that when it dried it would dry straight. This cake was alot of fun to make and fun looking too. It was red velvet and italian meringue buttercream.


Cake Time Total: 3 hours

A Hat Fit For A Queen

So I promised my Godmother a birthday cake. She lives far away and things were happening so long story short I made her this cake almost three months after her birthday. It was a red velvet cake with italian meringue buttercream and homemade caramel. For the design I was free to do whatever...in the end it ended up looking like a hat worn by an old english lady but I liked it.


Cake Time Total: 2 hours

Saturday, 28 July 2012

Baby Shower

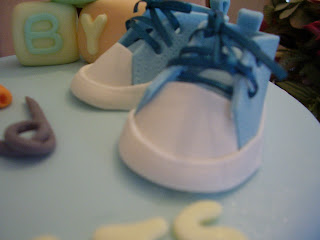
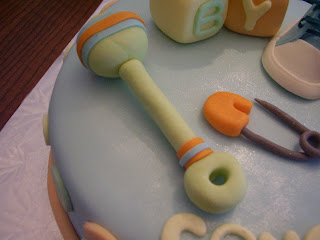
This was my first baby shower cake. I was given free will to decorate as I pleased. I had seen before people who made gumpaste baby booties for shower cakes when I was researching how to make gumpaste heels. As soon as I was given the opportunity to make this cake I knew I needed to make booties. I also decorated with a rattle, baby blocks, and a safety pin. The cake was lemon filled with lemon curd.


Cake Time Total: 2 hours

Friday, 13 July 2012

Fitness Retirement Cake

I'm coming to the end of my visit here in Canada with my family but before I leave there are cakes to be made! This week I made a retirement cake for my friend Alison's dad. He has been spending the last couple of months working out so the theme was fitness. This was the first time that I made custard for a cake. I was worried it wouldn't hold up well but it did just fine. The cake was alternating layers of chocolate and white cake filled with vanilla custard, masked with Italian meringue buttercream and covered in fondant. I decorated with little pieces of gym equipment.


Cake Time Total: 3 hours

Sunday, 24 June 2012

Father's Day

Since we were celebrating Father's Day at my aunts house, I thought it would be fun to make a quick cake and a way of experimenting with new flavours and getting feedback quickly from many people. The cake I decided to make was a red velvet cake (the recipe was from an amazing book I got for christmas last year called the Modern Cafe). For the inside filling I decided to make a pineapple reduction and mix it into some italian meringue buttercream. For the outside I was running low on time and just decided to skip the fondant and finish the cake with buttercream.


Tuesday, 12 June 2012

Bridal Shower

This is a cake I made for my soon to be sister-in-law's bridal shower. The theme was tulips. It was my first time making gumpaste tulips and I can say that they look a lot easier to make then they actually are. I wish that I had made more flowers but I ran out of time and came across the dilemma of the wire I used being too thin which is another story in itself. The cake was delicious. I decided to try something new by making a coconut cake with raspberry Italian meringue buttercream. I also saw a picture online of a cake that was covered in chocolate pieces giving it a sort of "bark" effect and I though that was quite interesting so I tried it out...it was very quick and easy to do, tempering the chocolate took a bit of time but it was worth not having to spend the money on fondant.


Cake Time Total: 3 hours

Wednesday, 9 May 2012

German Chocolate Cake

This is my first stab at a German chocolate cake and it was absolutely delicious! I made this cake for my boyfriend's moms birthday and it was a huge hit! When it came to decorating I didn't have much to work with since all my tools are back home so I went traditional with it; just a few rosettes, pecans, and toasted coconut.

German Chocolate Cake

Ingredients

4 oz of semi-sweet chocolate
1/2 cup water
2 cups flour
1 tsp baking soda
1/4 tsp salt
1 cup butter, softened
1 1/2 cups sugar, and 1/4 cup sugar
4 eggs, separated
1 tsp vanilla
1 cup buttermilk

Directions
  1. Preheat oven to 350. Grease cakes and line bottom with parchment paper.
  2. Microwave chocolate and water for about 1-1/2 to 2 minutes or until chocolate is almost melted, stirring after 1 minute. Set aside to cool.
  3. In a large bowl, mix flour, baking soda and salt, set aside.
  4. Beat butter and sugar in large bowl on medium speed until light and fluffy. Add egg yolks one at a time, beating well after each addition. Blend in melted chocolate and vanilla. Add flour mixture alternatively with buttermilk, beating until just blended.
  5. In a separate bowl, beat egg whites and 1/4 cup sugar on high speed until stiff peaks form. Fold egg white into chocolate mixture.
  6. Pour batter equally into pans and transfer to over, baking 30-40 minutes or until toothpick comes out clean.

Coconut-Pecan Filling

Ingredients

1 cup cream
1 cup sugar
3 egg yolks
1/2 cup butter
1 1/2 cup coconut
1 1/2 cup chopped toasted pecans

Directions
  1. Combine sugar, milk, egg yolk, butter and salt in large saucepan and whisk until blended.
  2. Cook over medium heat until mixture comes to a boil and begins to thicken.
  3. Stir in coconut and pecans and remove from heat.

Chocolate Frosting

Ingredients

8 oz semi-sweet chocolate
2 tbsp light corn syrup
1 1/2 oz butter
1 cup cream, and another cup of cream

Directions
  1. In a large bowl add chocolate and light corn syrup.
  2. Heat cream in a small saucepan over medium heat until just boiling.
  3. Pour hot cream over chocolate and stir until chocolate melts and mixture becomes completely smooth.
  4. Wisk the second up of whipping cream and combine with the chocolate mixture once it has cooled.


Thursday, 3 May 2012

Easter Chicks

Yes I know it's way past Easter, but I've been busy with school and finals that are coming up so I have not been able to post recently. Since I was going to my boyfriend's grandparent's house for Easter I wanted to make something special so I got the idea from Martha Stewart's website to make these cute little chickadee cupcakes. The recipe that Martha had on her website was for vanilla cupcakes but since it was Easter I thought that carrot cupcakes would make a better substitute. I used the recipe that I have on my blog which is linked here. Then you just ice the cupcakes with your favourite icing, dunk them in toasted coconut, and then simply pipe little birds and violaaa you have birds in a nest.